Mastering VPC Peering Connections in AWS: A Comprehensive Guide


Introduction
A Virtual Private Cloud (VPC) serves as a dedicated virtual network within your AWS account, ensuring logical isolation from other virtual networks in the AWS Cloud. Within your VPC, you can seamlessly launch AWS resources, including instances such as Amazon EC2 instances.
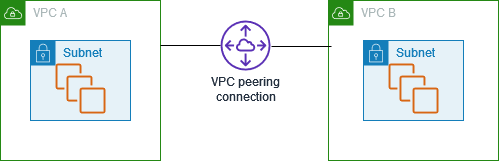
A pivotal feature within the AWS networking landscape is the VPC peering connection, which establishes a networking link between two VPCs. This connection empowers you to route traffic between them using private IPv4 or IPv6 addresses. Instances in either VPC can communicate as if they belong to the same network. Notably, VPC peering connections can be established between your own VPCs or extended to VPCs in different AWS accounts, even spanning different Regions, known as inter-Region VPC peering connections.
Unlike traditional gateways or VPN connections, AWS leverages the existing infrastructure of a VPC to create a VPC peering connection. This eliminates the need for separate physical hardware, avoiding single points of failure and bandwidth bottlenecks.
One of the primary advantages of a VPC peering connection is its role in facilitating data transfer. For instance, if you manage multiple AWS accounts, you can peer VPCs across these accounts to establish a collaborative file-sharing network. Additionally, a VPC peering connection enables other VPCs to access resources within a specific VPC.
When establishing peering relationships between VPCs across different AWS Regions, various resources within these VPCs—such as EC2 instances and Lambda functions—can communicate using private IP addresses. This communication occurs without the reliance on gateways, VPN connections, or network appliances, and the traffic remains within the private IP space. Importantly, all inter-Region traffic is encrypted, providing enhanced security and resilience against common exploits and DDoS attacks. The communication stays on the global AWS backbone, never traversing the public internet. This not only mitigates threats but also offers a straightforward and cost-effective solution for sharing resources between regions or replicating data for geographic redundancy. Inter-Region VPC peering stands out as a powerful tool in optimizing network architecture within the AWS ecosystem.
Establishing secure and efficient communication between Virtual Private Clouds (VPCs) is a crucial aspect of architecting robust cloud infrastructures. In this technical blog post, we will delve into the intricacies of creating VPC peering connections in Amazon Web Services (AWS). Whether you're connecting VPCs within the same account or spanning different accounts and regions, this guide will equip you with the knowledge to seamlessly set up and manage VPC peering connections.
I. Overview of VPC Peering Connections: Before we dive into the step-by-step procedures, let's understand the fundamentals of VPC peering connections. These connections enable secure communication between VPCs, facilitating the exchange of traffic without the need for internet gateways, VPNs, or other complex setups.
II. Creating VPC Peering Connections: To create a VPC peering connection, the process involves a requester and an accepter. The requester initiates the connection, and the accepter must confirm the request. The steps vary based on factors such as VPCs in the same account, different accounts, and different regions.
A. Prerequisites:
Before initiating the process, ensure the following prerequisites are met:
Review limitations and rules for VPC peering connections.
Avoid overlapping IPv4 CIDR blocks between VPCs, as this leads to immediate connection failure.
Be aware of VPCs having unique IPv6 CIDR blocks.
B. Creating VPC Peering Connections:
1. VPCs in the Same Account and Region:
a. Open the Amazon VPC console.
b. Navigate to Peering connections.
c. Choose "Create peering connection" and configure the necessary information.
d. Accept the request and modify route tables for seamless traffic flow.
2. VPCs in the Same Account and Different Regions:
a. Open the Amazon VPC console.
b. Navigate to Peering connections.
c. Choose "Create peering connection" and configure details, including the region of the accepter VPC.
d. Accept the request and modify route tables for optimal connectivity.
3. VPCs in Different Accounts and the Same Region:
a. Open the Amazon VPC console.
b. Navigate to Peering connections.
c. Choose "Create peering connection" and input relevant details, including the AWS account ID of the accepter VPC.
d. Accept the request and manage tags for personalized identification.
4. VPCs in Different Accounts and Regions:
a. Open the Amazon VPC console.
b. Navigate to Peering connections.
c. Choose "Create peering connection" and provide essential information, including the AWS account ID and region of the accepter VPC.
d. Accept the request and configure tags for better organization.
5. Using the Command Line:
AWS CLI:
create-vpc-peering-connectionAWS Tools for Windows PowerShell:
New-EC2VpcPeeringConnection
Certainly! Below are the details on how to create a VPC peering connection using the command line with AWS CLI and AWS Tools for Windows PowerShell.
Using AWS CLI:
Command: create-vpc-peering-connection
Open your command-line interface.
Use the following command template to create a VPC peering connection:
aws ec2 create-vpc-peering-connection --vpc-id <requester-vpc-id> --peer-vpc-id <accepter-vpc-id> --peer-owner-id <accepter-account-id> --peer-region <accepter-region><requester-vpc-id>: The ID of the requester VPC.<accepter-vpc-id>: The ID of the accepter VPC.<accepter-account-id>: The AWS account ID that owns the accepter VPC.<accepter-region>: The region where the accepter VPC is located.
After running the command, you will receive a response containing information about the newly created VPC peering connection, including the
VpcPeeringConnectionId.
Using AWS Tools for Windows PowerShell:
Command: New-EC2VpcPeeringConnection
Open the AWS Tools for Windows PowerShell.
Use the following command template to create a VPC peering connection:
New-EC2VpcPeeringConnection -VpcId <requester-vpc-id> -PeerVpcId <accepter-vpc-id> -PeerOwnerId <accepter-account-id> -PeerRegion <accepter-region><requester-vpc-id>: The ID of the requester VPC.<accepter-vpc-id>: The ID of the accepter VPC.<accepter-account-id>: The AWS account ID that owns the accepter VPC.<accepter-region>: The region where the accepter VPC is located.
After running the command, you will receive a response containing information about the newly created VPC peering connection, including the
VpcPeeringConnectionId.
These commands allow you to initiate the creation of a VPC peering connection directly from the command line, providing a convenient and scriptable way to manage your AWS resources. Make sure to replace the placeholder values with the actual IDs and information relevant to your specific setup.
III. Conclusion: In this comprehensive guide, we've explored the nuances of creating VPC peering connections in AWS. By following these step-by-step procedures, you can seamlessly establish and manage secure communication between your VPCs. Whether you prefer the AWS Management Console or command line, this guide equips you with the knowledge to navigate the complexities of VPC peering connections effectively. Elevate your cloud architecture by mastering the art of VPC peering in AWS.